Friday, June 8, 2012

Rifle Leatherwork

As you have seen from my previous photos, there was a small amount of leatherwork on some panels of my rifle. As a beginning leatherworker, I look for the chance to tool accent pieces when I can. Leatherworking is an art that is highly rewarding- with a bit of time and skill you can create handsome, impressive pieces worth quite a bit of money in the open market.

Let me show you my progress shots.

Again with the "forgetting to take a before shot". Let us think of a simple strip of veg-tanned leather. Vegetable-tanned leather is best for tooling and dyeing as it won't self-heal and is extremely porous.
The acanthus design here was hand-drawn with a pencil.


The first photo here is of the first step in the tooling process, making your lines permanent. I cut my lines into the leather face with a swivel knife. A swivel knife works like a calligraphy pen, but with a rotating barrel to get tight curves. It's also imperative to keep your leather moist, lest your knife drag and mar the face.


The next step is the tooling- using the various stamps to create texture and depth. This is the point where you'll know if the design will work as a leather project. I was originally impressed with the illustration, but tooling it made it come alive. The first step in tooling is edging the main body of the project. Tooling leather is similar to sculpting. Yu need to analyze what will go where, and your depth of tooling to determine what needs to be raised and what needs to be lowered to have the most visually pleasant image possible.


This image shows my having laid the dye into the leather. Notice how the acanthus leaf is lighter than the main background? I used a resist on that area to avoid it soaking in the dye as readily as other areas. Resists can be tricky- touch the wrong area and that resist is never coming out. EVER. At the very least, dye can be covered with color to lighten it up... as you will see next. 


I used leather paint to accent some of the acanthus leaf edges. It pops so much more now. I also laid in the sealant to finish the piece, hence the shiny, glimmery bits.


And here's the final piece in its rightful place. It adds a bit of simple, understated detail to the rifle, and I'm quite proud of it. As I get more involved, I'm sure my gun will evolve as well. I will keep you updated. 


Friday, May 18, 2012

Steampunk Rifle Mod


This was my first Mod, and I received a lot of help on it from my boyfriend. He's not into Steampunk, but he's into Guns, and helped me a lot. 

My goal was to create a Steampunk Sniper Rifle. I had an idea of what i wanted, but had a hard time of figuring out how to get it there. I wanted it to look good from a distance, with lots of intricate details up-close, and to be lightweight for carrying and durable to be handled and banged around.

One of the things that you have to know is that I forget to take BEFORE pictures. I get so excited to get started I tear into it and then go... "oh, oops. Forgot to take a picture."

So, lemme draw you a visual picture. Imagine a Chinese pump-action BB gun, with a crooked barrel and excessive rust, with a chipped and painted wood stock.
That's what this started as. 

Okay! 


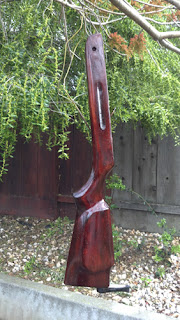
This is said ugly stock. As you can see, it is covered in a clear coat, 10 layers of crappy poo-brown varnish and scrapes, pits and muck galore. We stripped this wood of this stain, At first i tried turpenoid. Did not work. So we moved onto a sheet of sanding paper. Worked ok. Moved onto an Electrical sander, worked better. Granted it also melted layers of varnish and showed us the repulsive and pitted original pine-wood stock. Waa!  
Still determined to work this out, I forged ahead.


This delicious walnut stain was perfect. The color would go well with the Copper I planned to add. However, the day was windy- do NOT stain things in the wind. Took a bit of sanding to shake the twigs and bubbles.


The mockup of the stained stock and the PVC parts. We worked to get the lengths right, the tube dimensions acceptable and the pieces to fit together before we cemented it all together. 


We painted all the PVC in two nights. We used a Valspar brand Copper Flake- that stuff clings to everything and leaves a nice, matte finish. 


This is the painted PVC tubes, finally sealed together. The Barrel and Scope are not adhered to the Gun stock securely. In this photo, only one bolt holds the gun together. This mock-up showed me what needed to be added, and I got to work on it right away.


The Leather hand grip helped secure the barrel even better. Hand-tooled myself with an acanthus pattern, it worked in the detail I was looking for while keeping the gun functional.


The Current final Photo shows off the leather Acanthus cheek pad I hand-tooled as well. I also wrapped the scope with copper wire, and added brass stud accents. She's been out to a Faire once so far, and did admirably. She still needs a bit of detail. I plan on adding some copper-leaf accents to the stock and filigree to the barrel. I'm also entertaining the idea of adding gauges and tubes- not necessary but will increase the Steampunk quotient.

Hope you enjoyed! See you soon!